
The following is the initial front-end testing strategy I proposed at 99.co back in early 2019, which starts off with a quote from Kent C. Dodds’ Testing JavaScript course:
A four-layer proven method for testing software The Testing Trophy is a bottom-to-top professional method for testing web applications. It’s about writing just enough tests—the right tests. It’s not about reaching for 100% coverage. 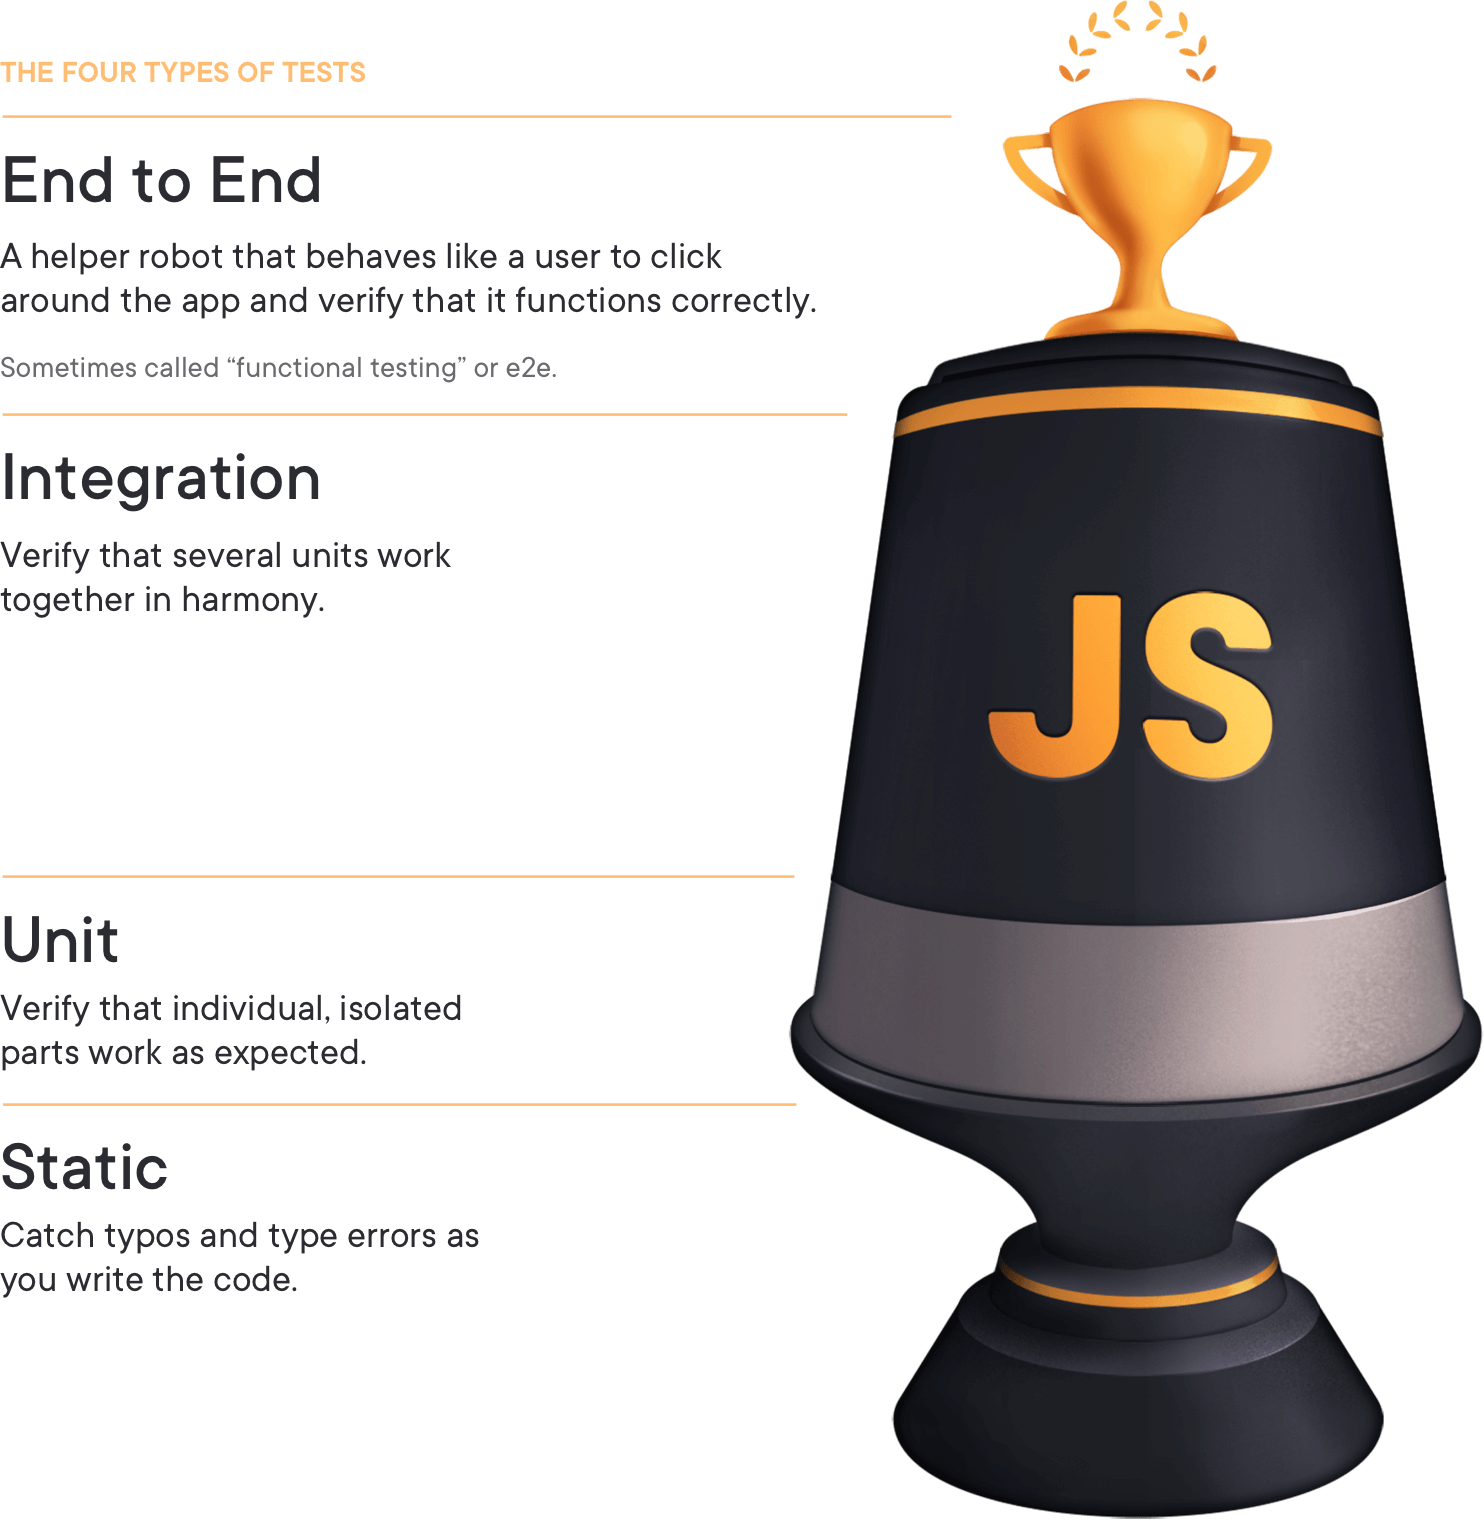
By using this proven testing method, you’ll layer these techniques:
- Use a static type system and a linter to capture basic errors like typos and syntax (e.g.. Using ESLint and TypeScript / Flow)
- Write effective unit tests that target the critical behavior and functionality of your application. (e.g. Using Jest)
- Develop integration tests to audit your application holistically and make sure everything works together correctly in harmony. (e.g. Testing the Redux store connected components using Jest)
- Create end-to-end (e2e) functional tests for automated click-testing of critical paths instead of relying on your users to do it for you. (e.g. Using https://cypress.io) These four layers of automated testing give you the playbook to ship professional JavaScript applications with confidence, speed, and money savings. Every time.
Each of unit, integration and e2e testing have their own benefits and tradeoffs. Additional reading which talks about the tradeoffs we make to write each type of tests. A relevant quote from this article: “In particular, static analysis tools are incapable of giving you confidence in your business logic. Unit tests are incapable of ensuring that when you call into a dependency that you’re calling it appropriately (though you can make assertions on how it’s being called, you can’t ensure that it’s being called properly with a unit test). Ul Integration tests are incapable of ensuring that you’re passing the right data to your backend and that you respond to and parse errors correctly. End to End tests are pretty darn capable, but typically you’ll run these in a non-production environment (production-like, but not production) to tradeoff that confidence for practicality.”
Testing Strategy
It’s imperative to have a clear plan with priorities before embarking on such an enormous endeavour. We will aim to answer these questions:
- Which parts of the app to test? Which not to test?
- What to test in a component?
- How to organize the tests? - folder structure, organizing tests within a file
- How to write tests - snapshot tests vs manual assertions - when to use which?
- Other important guidelines - for instance, don’t test implementation details, test only what the user sees. For e.g. the user doesn’t care if you use a particular React lifecycle method
What not to test?
- Third-party libraries. Don’t test functionality that is taken from another library. You are not responsible for that code. Skip it or imitate implementation if you need it to test your code.
- Constants. The name speaks for itself. They are not changeable. They are sets of static code that are not intended to vary.
- Inline styles (if you use them in your component). In order to test inline styles, you need to duplicate object with styles in your test. If object styles change, you must change them in the test too. Don’t duplicate a component’s code in tests. You will never keep in mind to change it in tests. Moreover, your colleague will never realize that there’s been duplication. In most cases, inline styles don’t change the component’s behavior, so they shouldn’t be tested. There can be an exception if your styles change dynamically.
- Things not related to the tested component. Skip covering with tests components that were imported in the tested component. Be careful if it is wrapped in another one. Don’t test the wrapper, just analyze and test them separately.
What to test?
Roughly speaking, everything else but we will follow a priority order that takes into account the impact of the components to be tested with a general rule of always starting from the simplest components. Generally, a unit is a React component.
What to test in a React component?
- General rule: Treat the component like a black box - assert the output given test props. Don’t attempt to individually unit test the internal methods used by the component because the user can’t see it and doesn’t care about the implementation.
- It must render: At the very least, make sure the component renders without error. This verifies there are no JSX syntax errors, that all variables are defined, etc. This could be as simple as verifying that the rendered output is not null.
- Test the output: One step above “it renders” is “it renders the correct thing.” Given a set of props, what output is expected? Does Person render its name and age, or does it render a name and “TODO: age coming in v2.1”?
- Test the states: Every conditional should be accounted for. If the classNames are conditional (enabled/disabled, success/warning/error, etc), make sure to test that the className-deciding logic is working right. Likewise for conditionally-rendered children: if a Logout button is only visible when the user is logged in, for instance, make sure to test for that.
- Test the events: If the component can be interacted with an input or button with an onClick or onChange or onAnything), test that the events work as expected and call the specified functions with the correct arguments (including binding this, if it matters).
- Test the edge cases: Anything that operates on an array could have boundary cases — an empty array, an array with 1 element, a paginated list that should truncate at 25 items, and so on. Try out every edge case you can think of, and make sure they all work correctly.
Priority
General rule: start testing the most impactful presentational components but first test the smaller components that those components are dependent on. For e… Login is an important component to test. Test the smaller components that Login depends on like Button first.
Parts of the product to be prioritized from a product perspective
Do this for your product to identify the priority of components to be thoroughly tested. This is applicable if you are retrofitting tests in an application that does not have any. If you are creating a product from scratch, it’s better to start writing tests upfront.
Parts of the product to be prioritized from a developer’s perspective
- Form field components
- Util functions
- Presentational widgets
- Modals
- Higher Order Components
- Redux-connected components
Organisation Across the repo: Leverage Jest’s recommended folder structure - mirror the src directory and add .test.js suffix to distinguish the test file from the src file -src/desktop/.../Header.js test/desktop/.../Header.test.js Within the test file: Use test suites using describe to organize tests within each file.
Snapshot testing What is it? Why is it useful?
Snapshot testing is a way to simplify writing and maintaining assertions and it’s a key feature of Jest. Learn more from the following ways:
When to use?
Snapshots are ideal for testing things that you don’t expect to change or don’t want to change in the future. Snapshots provide a form of regression testing. We’ll use them to test components, actions and reducers and ensure they only change when we want them too. Source
When not to use snapshot testing?
Don’t use Snapshots when you know that something will be different every time you run the test or when you first start writing a new component, action or reducer.
Example 1: You have a utility function that returns a random string. You cannot test this with Snapshots as it will be different each time. Instead, I recommend testing that the string is the proper length and made up of the correct types of characters based on the type of string being generated.
Example 2: You just started writing a new component and are writing tests as you go. I recommend avoiding Snapshots at first. Instead polish the component and get it close to what you know it will be. Then switch over to using Snapshots. Source
Keep snapshots small. Don’t take and commit snapshots of high-level components because that becomes unreadable. Source
Prettier integration
If you have Prettier installed, it enables the use of inline snapshots.